Cookies Galore: Shortbread Style

Less than week until Christmas. I love this time of year! Our neighbors host a cookie day every year where we go and make dozens of cookies. The kids roll out sugar cookie dough and use Christmas themed cutters to create their batch. After the cookies bake, we all spend time decorating them. It’s so much fun, and we really love doing it every year.

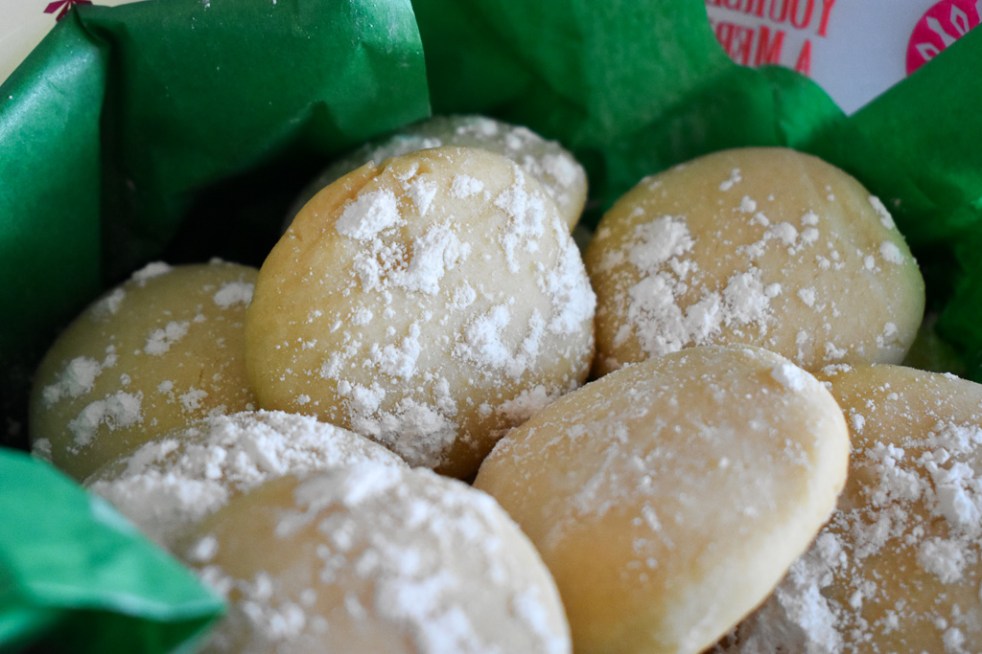
One of the features of cookie day is bringing your own cookie recipe to share. You can either make them ahead of time, or bring the ingredients over to bake then and there. I decided to make a batch of good old-fashioned shortbread cookies to take over. I have made several recipes over the years, but this one is just unbeatable. It is simple, fast, and goes great with a cup of coffee or hot cocoa.

Classic Shortbread CookiesDSC_1171

You will need:

  • 2 cups of flour
  • 2 sticks of unsalted butter (1/2 lb) at room temperature
  • 1/2 cup powdered sugar
  • 1 tsp vanilla
  • 1/4 tsp salt

Preheat your oven to 350*F

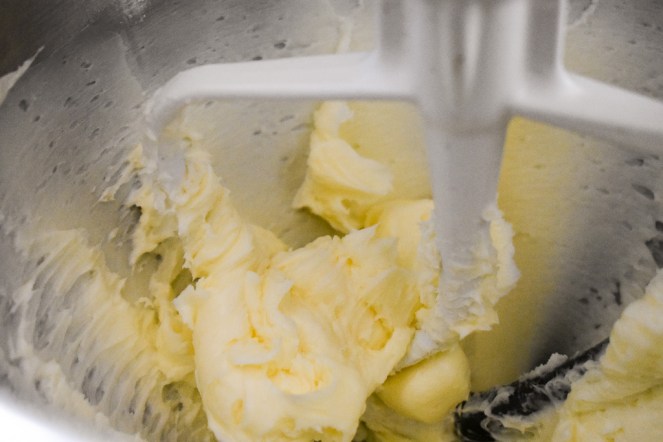
Cream the butter and powdered sugar together until light and fluffy.

DSC_1181

Add in the flour, salt, and vanilla. Mix until incorporated.

DSC_1186

Pour the dough onto a floured sheet of parchment paper. Shape into a cylinder with your hands, and then use the parchment paper to roll it up and smooth it out into a cylindrical log. Gently press in the ends of the dough so they are flat. You can also do this with plastic wrap if you don’t have parchment paper.

DSC_1188DSC_1190DSC_1197

Roll up the log, tuck in the ends, and put into the refrigerator for 30 minutes (this is important in order for the cookies to hold their shape when they bake).

DSC_1200

One it is chilled, slice into 1/4 inch pieces, and quickly roll into a ball. Press down gently between your palms to flatten them a bit.  This is a rough cookie shape, but it is one I always use for shortbread if I am just making basic cookies. You can also roll the dough into a 1/4 inch thick rectangle and cut it into bars. The less you handle the dough, the better.


Bake at 350*F for 12-14 minutes, or until pale golden. Top them with a sprinkling of powdered sugar, and enjoy 🙂

DSC_0005

I hope you love these cookies as much as I do. Sometimes I like to add a 1/2 cup of chopped pecans into the dough for a little change. They are also delicious dipped into warm melted chocolate.

This is a great recipe to let the kids get involved with. They can dump the ingredients into the bowl and help form the dough into a log. Kids love to be a part of things, and it’s a great opportunity to spend some time together while talking about the real meaning of (Christ)mas. My kids are still little, so we have to keep building on the story every year with more detail. It’s so funny to hear the little ones try and remember everything. Their imaginations are hilarious 🙂

As always, thank you for your support.

Lots of love and many blessings,

Chelsea

Then Mary said, “Here am I, the servant of the Lord; let it be with me according to your word.” Then the angel departed from her.

Luke 1:38

Cast Iron Cornbread

I have been sick for the last ten days! I can’t seem to shake this cold. All I have been wanting is take out, soups, and any and all southern cuisine I can get my hands on.

This week’s feature is not a from scratch recipe. I will never claim to have a super secret ultra special cornbread recipe….because there is only one cornbread that exists in my life- and it is Jiffy cornbread. Yes. The blue and white $0.59 box next to all of the other corn muffin mixes. It is my favorite, will always be my favorite, and can never be replicated no matter how good your grandma’s cornbread recipe is. Point made I hope.DSC_0604

Now, even though I don’t have a special homemade recipe, there is a method to my cornbread madness that I swear by, and after you go through these steps, you won’t want to make cornbread another way.


Cast Iron Cornbread

DSC_0740

You will need:

  • cast iron skillet
  • 2 boxes of Jiffy corn muffin mix (or, mix up a batch of your favorite recipe…if you must)
  • 2 eggs
  • 2/3 cups of milk
  • 1/4 cup of a good frying fat (vegetable/canola oil, shortening)

Preheat your oven according to recipe directions. Place the fat of choice  into the cast iron skillet, and put it into the oven to get nice and hot. I have used vegetable oil, canola oil, and shortening. They all work beautifully. I had shortening on hand, so that is what I used.DSC_0676

Mix the corn muffin mix as directed on the box. Jiffy is super easy, so if you want to let the kids help, this is definitely a recipe to let them have a go at!DSC_0652

Let the mix hang out in the bowl for a bit. It will thicken and become a little aerated. This is what you want. However, if it is too thick (like mashed potatoes) add in more milk 1 Tbsp at a time until it barely falls off the spoon. You don’t want it too thin like cake batter, but you don’t want it too thick like mashed potatoes. Somewhere right in the middle where you can slowly pour it out of the bowl.

DSC_0666

Once the oven is preheated, carefully take out the cast iron skillet with the hot oil and set it on a heat-safe surface.

Gently pour the cornbread mix into the hot oil. It will begin to bubble on the sides. This is exactly what you want.

DSC_0703

Put the cornbread into the oven and bake as directed where the the top is golden brown and the sides are just separated from the skillet. DSC_0735

While the cornbread is fresh out of the oven, butter generously. I like to take a stick and rub it all over the top and against the sides of the skillet. Let the butter melt into the space between the skillet and the cornbread. The butter will sizzle against the heat and absorb into every little crevice. The bottom and sides will be nice and crispy, and the inside will be fluffy and buttery. You will probably be salivating at this point. Welcome to the team. It happens to the best of us.

Slice into triangles and serve alongside some chicken soup, my red wine braised short ribs, or just by itself with a cold glass of milk or sweet tea.

DSC_0752

I hope you and your family enjoy it. This method will work with any cornbread recipe, so if you have a super special homemade recipe that has been passed down from generation to generation- go for it! You really can’t beat the crunchy bottom and sides.

As always, thank you for your support. I hope you and your family went to Mass today to start the week off feeling encouraged and uplifted. Please pray for me to get over this cold. I am tired of feeling under the weather.

Lots of love,

Chelsea

22 By contrast, the fruit of the Spirit is love, joy, peace, patience, kindness, generosity, faithfulness.

Galatians 5:22


Olive Oil Herb Savers

I noticed that after preparing a few meat-oriented dishes, I had a bunch of herbs leftover. If you’re like me, you are on a budget, so going out and spending extra money on fresh herbs each and every time you need them is a little expensive. These can vary in price year around, but no matter what- I tend to throw away a lot of what I don’t use, and I feel guilty about it! I don’t always need 12 sprigs of thyme, or 6 sprigs of rosemary, etc. To solve this wasteful issue- I have found a great way to store them, and I want to share it with you here. It is simple, convenient, and easy to use all year long.

Olive Oil Herb Savers

You will need:

  • Leftover herbs
  • 1/2 cup olive oil
  • Ice cube tray
  • Blender

If the thyme is on dried sprigs, I remove the leaves and only use those. If the thyme is from a live plant, I just snip the entire stem and use that in there. For rosemary, I strip the stem completely.

For this recipe, the leftovers I had were two sprigs of rosemary and one bunch of live thyme. It ended up being about 2 Tbsp of rosemary, and 2 Tbsp thyme.

DSC_0574DSC_0581

I put the herbs in a blender followed by the olive oil. I gave the blender a go until everything was well incorporated. Once it was blended, I poured the liquid into an ice cube tray. This recipe made exactly 12 cubes. Each ice cube holds 1/8 cup of liquid (which is 2 Tbsp- roughly what most recipes call for when it comes to sauteing with olive oil).


Once the cubes are frozen, run the bottom of the tray under warm water for about 10 seconds to loosen them up. You should be able to pop them out like ice cubes after that. Transfer them to a gallon freezer bag. When a recipe calls for herbs, pop a cube into a pan first, and then heat it up. If you put the frozen cube into a hot pan- get ready for a sputtering mess!  Once it’s melted and getting hot, add in your meats, veggies, and other ingredients. Your kitchen will begin to smell amazing.

These little cubes are a unique method to keep flavor in your dishes when you can’t get your hands on fresh herbs, or if you just don’t want to waste your leftovers. It’s a great way to stick to your budget, and it also provides “go to” ideas for meal planning when you’ve got a cut of meat you’ve been holding on to with no inspiration.

I love cooking for my family and taking all of these beautiful photos. I am blessed to be able to do this, and I am so happy you are interested in reading these. As I mentioned above, I have several more recipes I photographed. I will have them up in the coming days and weeks, to include a fun holiday gift idea for family and friends.

Remember to pray with your family at dinner. Eating together and spending that precious time in each other’s company is priceless. Let the stress of the day go, put down your phone, turn off the TV, and just be with each other.

I hope you have a wonderful week. Advent is right around the corner and I can hardly contain myself! I love this season.  Thank you for your support. It means the world.

With love-

Chelsea

Follow me on Instagram

So then, whenever we have an opportunity, let us work for the good of all, and especially for those of the family of faith.

Galatians 6:10


My version of Zuppa Toscana (Instant Pot)

I fell in love with Olive Garden’s Zuppa Toscana many many years ago. It is creamy, a little spicy, and deceptively filling. I searched the internet on more than one occasion looking for an at-home recipe I could attempt in my own kitchen. I have tried 5-10 of these copy-cat recipes that have ALMOST hit the spot, but not quite. Many recipes call for too much red pepper, only hot Italian sausage vs. mild or sweet, or too much bacon (yes, such a thing… I know). Some were too spicy, too salty, or too greasy. By testing several recipes, and choosing what I liked about each of them, I have found what I consider the best way to get the perfect balance of everything.

Zuppa Toscana (Instant Pot + Stovetop + Slowcooker)

DSC_0329

You will need:

  • 1 lb mild or sweet Italian sausage
  • 1 bunch of kale (around 2 cups uncooked), torn into bite sized pieces
  • 8-10 small potatoes, or 2 large russet potatoes, cut into bite sized pieces, a small dice, quartered, etc. Whatever size you prefer in your soup. Leave the skin on. It tastes so much better that way. Plus, who likes to peel potatoes?!
  • 1 onion, chopped
  • 2 slices of bacon, chopped
  • 2 tbsp garlic, chopped
  • 1 tsp red pepper flakes
  • 4 cups of chicken broth (*I use chicken bullion a lot. If you do this, make 2 cups with double the bullion amount (like a homemade bullion concentrate) and then prepare 2 cups of water to follow it in the recipe)
  • 8oz heavy cream

Set your Instant Pot to saute. Once it is nice and warm, drop in the bacon and saute until it is nice and brown. Once it is brown, take it out and let it drain on a paper towel.


With the bacon grease still in the pan, add the onion and saute for 2-3 minutes until it just starts to soften. After that, go ahead and add in the Italian sausage and break it apart until it is fully ground.


Once the meat is mostly browned, add in the garlic and give it a good stir. The meat will continue to cook during the next few steps. Your kitchen should smell pretty awesome at this point!


After stirring the garlic into the meat, pour in the 4 cups of chicken broth (or the 2 cups of bullion mixture followed by the 2 cups of water) and stir it around while scraping the bottom. You want to get all of the brown bits off of the bottom of the bowl. This is such good flavor!


At this point, go ahead and add the potatoes and kale. Give it a good stir!


Put the lid on your instant pot and cook on high pressure for 5 minutes. Yep. That’s it. Just 5 minutes! Once the time is up, let the pressure come down with a natural release. dsc_0309.jpg
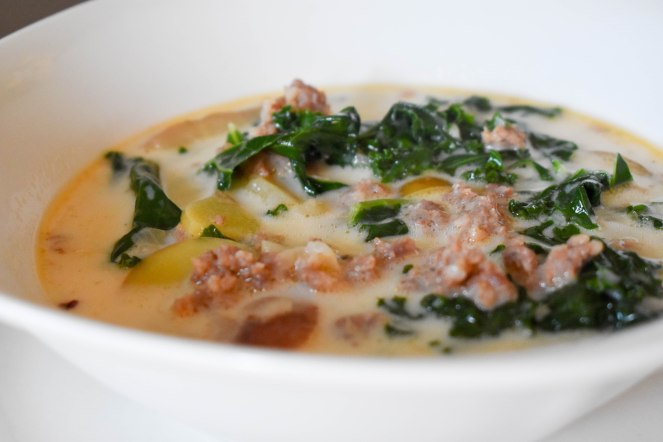
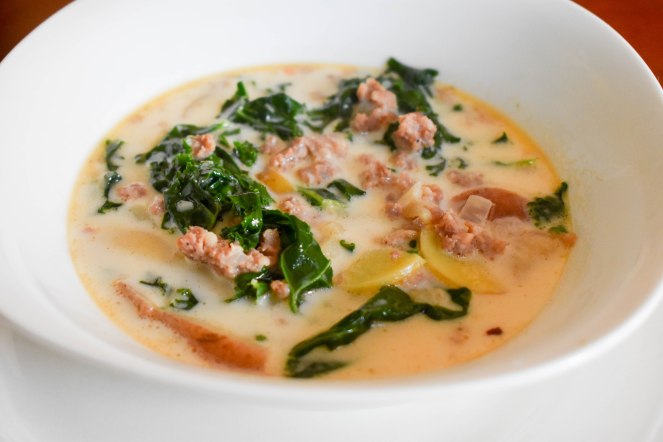
Once all the pressure is released, take off the lid and add in the cream, bacon, and red pepper flakes. Give it a good stir and let it hang out for 5-10 minutes while you get the table set, bowls ready, cups filled, and sticky kiddo hands washed. We all know how that goes.


You may notice little yellow bubbles, don’t worry. That is just the fat from the sausage, and it is pretty unavoidable unless you completely rinse the sausage after it cooks. It looks this way in the restaurant too. If it bothers you, you can brown the sausage separately and completely rinse and drain it before adding it to the pot.

Go ahead and ladle the soup into bowls. We ate ours with a crusty sourdough baguette. It was delicious, and the whole family enjoyed it. DSC_0333

If you end up making this, please leave me a comment letting me know how it turned out for you. If you have any questions, please don’t hesitate to ask!

*If you’re making this in a crock pot: you will need to saute the bacon, onions, and sausage in a separate pan. Add to the crock pot along with the chicken broth (or bullion mixture), potatoes, and kale. Cook on low for 6-8 hours. At the end, add in the bacon, cream, and red pepper flakes. Let it sit on low or warm for 5-10 minutes.

*If you’re preparing this in a dutch oven or soup pot: follow the cooking steps just like the Instant Pot. Once you put the lid on your soup pot or dutch oven, it needs to cook at a low simmer for 1.5-2 hours. At the end, add in the bacon, cream, and red pepper flakes. Let it sit on low or warm for 5-10 minutes before serving.

I really hope you enjoy this recipe. It is great for fall and winter, and everyone seems to like it. I love eating together as a family. It warms my heart and makes me feel good as a mother to make delicious food that everyone is eager to eat.

Remember to pray and give thanks for the food God has blessed you and your family with. Eating together at the table is one great way to spend quality time together at the end of a busy day. It’s also a great time to talk about God and why it’s important to keep Him the center of our lives.

As always, thank you for the support. God bless you and yours!

Chelsea

Happy are the people to whom such blessings fall; happy are the people whose God is the Lord.

Psalm 144:15