Buttermilk Pie

Y’all. This is the pie of all pies. If you’re a beginner pie maker or a seasoned pie veteran- this pie is for you. Thanksgiving is coming up and I highly suggest making one or two of these for the big day. Lots of love and many blessings!

You will need:

  • 1 9-inch pie crust, unbaked
  • 3 eggs
  • 1 cup of sugar
  • 4 tbsp butter, melted
  • 3 tbsp all-purpose flour
  • 1 cup buttermilk
  • 1 tbsp lemon juice
  • 1.5 tsp vanilla
  • 1/4 tsp salt
  • 1/8 tsp nutmeg (just a little pinch of a pinch)

Preheat your oven to 350* F.

Mix all of the ingredients together in a bowl. Pour into your pie crust. Bake for approximately 45 minutes. You know it’s ready when the middle is just slightly wobbly.

Remove from the oven and let it cool completely. I prefer mine to sit in the fridge for a few hours. I like to eat it cold, but that’s just me. 🙂

I hope you love this recipe! It is so delicious and easy, and the way I make it helps cut the sweetness a bit.

Lots of love and many blessings!

Chelsea

“I am the light of the world, says the Lord;
whoever follows me will have the light of life.”

John 8:12

Roasted Tomatillo Salsa

I started a garden back in March. I think a lot of people have decided to garden this year and, to me at least, it is a beautiful response to the quarantine life. Growing food with our own hands and resources gives us a sense of responsibility and empowerment. My four pepper plants have produced a ton of fruit this growing season. For this recipe, I used serrano peppers. If you cannot find those, you may substitute with jalapeños. I hope you love this recipe!

Roasted Tomatillo Salsa

dsc_0629

You will need:

  • 4 tomatillos
  • 2 serrano peppers, halved and de-seeded (or 1 large jalapeño halved and de-seeded)
  • 1 medium yellow onion, quartered
  • 1/4 cup cilantro, chopped
  • 4 whole garlic cloves, peeled
  • 3 tbsp olive oil
  • juice of 1 lime
  • 1 tsp salt
  • 1 tsp pepper

Set your oven to broil on low with the oven rack in the middle.

Prepare the tomatillos by peeling off the leaves. Tomatillos are a bit sticky- this is normal. Give them a good wash and pat them dry. The stickiness will most likely stay- and that’s completely fine.

Place the tomatillos, onions, garlic, and peppers onto a baking sheet lined with parchment paper, a silicone mat, or foil. Drizzle 2 tbsp of the olive oil along with the salt and pepper onto the veggies. Mix them all together until everything is coated.

Broil everything on low for 15-20 minutes, giving everything a flip about 1/2 way through. Once the time is up, everything should have a nice char to it. This is perfect.

Add the roasted veggies to a food processor or blender. Add in the remaining 1 tbsp olive oil, chopped cilantro, and lime juice. Give it a good pulse until it is the consistency that you like. If you want it chunky, don’t pulse it as much. If you want it thinner, keep pulsing until it is nice and smooth. I like mine somewhere in the middle.

Ladle into a jar or a container and let it cool to room temp. Once it has cooled, put a tight lid on and put it into the fridge until cold. This salsa gets better as it sits, trust me. Serve it on tacos, with chips, or on top of cheesy scrambled eggs.

DSC_0645

I hope you love this recipe. If you’re new to gardening or don’t have much of a green thumb- peppers are a great way to start. They are a forgiving plant and are great to grow in super hot and humid weather.

Lots of love and many blessings,

Chelsea

The Pharisees went out and took counsel against Jesus
to put him to death.

When Jesus realized this, he withdrew from that place.
Many people followed him, and he cured them all,
but he warned them not to make him known.
This was to fulfill what had been spoken through Isaiah the prophet:

Behold, my servant whom I have chosen,
my beloved in whom I delight;
I shall place my Spirit upon him,
and he will proclaim justice to the Gentiles.
He will not contend or cry out,
nor will anyone hear his voice in the streets.
A bruised reed he will not break,
a smoldering wick he will not quench,
until he brings justice to victory.

And in his name the Gentiles will hope.

Matthew 12:14-21

Banana Pudding

Easter is a pivotal time for Christians. I believe it is also the true marker of spring. With it comes a sense of renewal- just like the flowers that have been dormant all winter and the animals who return to their seasonal activities. Easter is a glorious season to celebrate!

Tomorrow is Easter and we will be spending it locked in our homes with our nearest and dearest. I don’t have many Easter lunch traditions, but one has stuck- and that is banana pudding. I make it every Easter. It doesn’t matter if we have ham, chicken, or roast- there is always banana pudding for dessert. This is also the first time of the year that I make it as it seems like a spring/summer dessert for me. I make it throughout the summer and stop when it becomes cooler. I hope you love this recipe!

Banana Pudding

DSC_0508

You will need:

For the pudding:

  • 5 cups whole milk
  • 1 1/4 cup sugar
  • 1/4 cup corn starch
  • 2 egg yolks
  • 2 tbsp butter
  • 2 tsp vanilla
  • 1/4 tsp salt

For the filling and topping:

  • 1 cup heavy cream
  • 1 box Nilla Wafers
  • 3 bananas
  • 1 tsp vanilla
  • 1 tbsp sugar

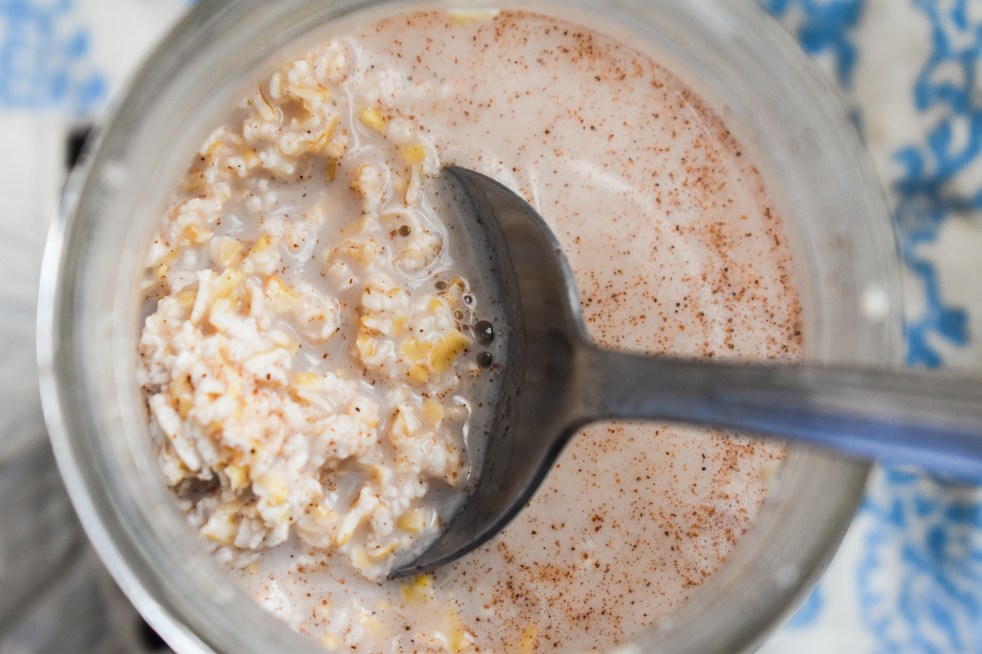
To make the vanilla pudding- add the milk, sugar, corn starch, egg yolks, and salt into a cold sauce pan. Stir together until combined. Turn on the heat to medium and gently whisk every 1-2 minutes. The mixture will gradually thicken. This will take approximately 10-15 minutes. Don’t stir too fast- just enough to keep it off of the bottom of the pan and from forming clumps. Once your pudding is thick, take it off the heat and run it through a fine mesh strainer and into a bowl. Stir in the butter and vanilla. Cover with plastic wrap with the plastic touching the pudding to prevent it from forming a skin. Refrigerate until cold (approximately 2 hours).

Once your pudding is cold, you are ready to start assembling your dish! I have used a deep pie dish, a 9-inch cake pan, a 7-cup Pyrex (what I have pictured here with the bees), a large ramekin, etc.

Layer 1: Single layer of Nilla wafers

Layer 2: Spread 1-2 cups of pudding

Layer 3: Top with banana slices

Repeat until your dish is full.

Add the cold heavy cream, vanilla, and sugar to a bowl or stand mixer and whip until it forms medium to stiff peaks. Spread over the top of the last layer. Sprinkle crushed Nilla wafers on top or add seasonal Chessman cookies- whichever you prefer! I have done both and it always looks beautiful no matter what!

I like to let mine sit for a few hours in the fridge (overnight is better). The Nilla wafers soften just enough to form a dense cake-like layer between the pudding and bananas. Of course- it is wonderful right after it is made as well! You really can’t go wrong with banana pudding.


I hope your Easter is full of love, prayer, and appreciation for the sacrifice that was given up for you. I recommend the book The Fourth Cup by Scott W. Hahn. It is an incredible read!

Lots of love and many blessings,

Chelsea

After the sabbath, as the first day of the week was dawning,
Mary Magdalene and the other Mary came to see the tomb.
And behold, there was a great earthquake;
for an angel of the Lord descended from heaven,
approached, rolled back the stone, and sat upon it.
His appearance was like lightning
and his clothing was white as snow.
The guards were shaken with fear of him
and became like dead men.
Then the angel said to the women in reply,
“Do not be afraid!
I know that you are seeking Jesus the crucified.
He is not here, for he has been raised just as he said.
Come and see the place where he lay.
Then go quickly and tell his disciples,
‘He has been raised from the dead,
and he is going before you to Galilee;
there you will see him.’
Behold, I have told you.”
Then they went away quickly from the tomb,
fearful yet overjoyed,
and ran to announce this to his disciples.
And behold, Jesus met them on their way and greeted them.
They approached, embraced his feet, and did him homage.
Then Jesus said to them, “Do not be afraid.
Go tell my brothers to go to Galilee,
and there they will see me.”

Matthew 28: 1-10


Buttermilk Pie

Here is something for you on this sweet Sunday- Buttermilk pie! This is my sister Morgan’s favorite pie, so it is only appropriate that I give her access to a no-fail recipe :). This pie is incredibly easy to make. You can put all of the ingredients into a blender, pour into a pie crust, and bake!

I hope you spend some time today in your kitchen prepping this sweet and satisfying dessert. Baking is a labor of love- and I often use this time to relax, pray, and reflect on God’s immense blessings. I hope you love this recipe!

Buttermilk Pie

DSC_0446

You will need:

  • 1 cup of buttermilk
  • 1 cup of sugar
  • 1 stick of unsalted melted butter (aka 8 tbsp or 1/2 cup)
  • 3 eggs
  • 3 tbsp flour
  • 1 tbsp lemon juice
  • 1.5 tsp vanilla
  • 1/4 tsp salt
  • 1 unbaked pie crust (I just use a store-bought one).

Preheat the oven to 350* F. Place the pie crust into the pie dish. Perforate the bottom of the crust with a fork approximately 20 times. This will help the bottom cook evenly and not become soft.

Add all of the ingredients into a blender and blend until smooth. Pour the mixture into the pie crust. If you are worried about the pie being too shallow, don’t worry- the crust will shrink down as it cooks. This will even everything out. 🙂

Bake at 350*F for 45-50 minutes. The pie will be golden on top and just a bit soft all around. Take it out and let it sit on the countertop at room temperature for 30 minutes. From here, you can cover it and leave it at room temp until you’re ready to eat, or you can place it in the fridge for a few hours until it is cold. I prefer my buttermilk pie cold, but that is just my personal preference. 🙂

DSC_0446

This pie is not too sweet and the texture is incredibly satisfying. I hope you love it!

Lots of love and many blessings!

Chelsea

I urge you, brothers and sisters, in the name of our Lord Jesus Christ,
that all of you agree in what you say,
and that there be no divisions among you,
but that you be united in the same mind and in the same purpose.
For it has been reported to me about you, my brothers and sisters,
by Chloe’s people, that there are rivalries among you.
I mean that each of you is saying,
“I belong to Paul,” or “I belong to Apollos,”
or “I belong to Cephas,” or “I belong to Christ.”
Is Christ divided?
Was Paul crucified for you?
Or were you baptized in the name of Paul?
For Christ did not send me to baptize but to preach the gospel,
and not with the wisdom of human eloquence,
so that the cross of Christ might not be emptied of its meaning.

1 Corinthians 1:10-13, 17


Apple Cider

I am excited to share this recipe with you! I love apple cider and I really can’t believe it turned out so well. I love this season and I really enjoy making different foods this time of year. Anything to bring my family together is good to me! I hope you love this recipe.

Apple Cider (Instant Pot & Slow Cooker)

DSC_0195

You will need:

  • 6-8 medium apples, cored and sliced (leave the peel on) You can use whatever apples you have on hand. This equals ~2 lbs of apples. The bruised ones work well here too. They’re going to be cooked to a pulp- so go ahead and throw them in!
  • 4 cups of water
  • 1/2 cup of honey (you can use sugar here as well, but I prefer honey)
  • 2 Tbsp fresh lemon juice (about 1 lemon)
  • 3 large cinnamon sticks, or 5-6 small cinnamon sticks, or 1 Tbsp ground cinnamon
  • 1/2 tsp ground nutmeg
  • 1/4 tsp ground cloves (or 2 whole cloves)
  • 1/4 tsp salt

Equipment:

  • wire mesh strainer
  • storage container or pitcher
  • Instant pot (I will also add slow cooker instructions as well)

Add all of the ingredients to the Instant Pot or slow cooker bowl. Give everything a good stir making sure that the honey is not sticking to the bottom.

DSC_0184DSC_0189

Set the Instant Pot to high pressure, seal it, and cook for 10 minutes. Let it release naturally. If you are using a slow cooker, cook this on low for 6-8 hours.

Once the time is up, run everything through a fine mesh strainer and pour into whatever storage container you have chosen. (Save the apples and cinnamon sticks. You can make apple butter with this!) Pop it in the fridge and drink it within 1 week. I like to drink mine hot. Feel free to warm it up in the microwave or in a pan over the stove.

DSC_0214

I hope you give this a try. Apple Cider is incredibly easy to make (and much cheaper to do it yourself!). This time of year gets expensive when we start planning for all of the holidays, so go ahead and save yourself a couple of bucks by making things at home.

Lots of love and many blessings,

Chelsea

Blessed are you, Father, Lord of heaven and earth;
you have revealed to little ones the mysteries of the Kingdom.

Matthew 11:25


Brown Butter and Sea Salt Chocolate Chip Cookies

Simply put, I just wanted to make something sweet to share on this beautiful Palm Sunday.

Brown Butter and Sea Salt Chocolate Chip Cookies

DSC_1059

You will need:

  • 1 1/2 cups AP flour
  • 1 1/3 cups white sugar
  • 4oz semi-sweet chocolate chips
  • 1/3 cup canola, vegetable, or light olive oil.
  • 1 stick of butter
  • 2 Tbsp molasses
  • 1 egg
  • 2 tsp vanilla
  • 1 1/2 tsp sea salt
  • 1/2 tsp baking powder
  • 1/2 tsp baking soda

Preheat your oven to 350*F. Line two sheet pans with parchment paper or a silicone baking mat. In a skillet over medium heat, melt the stick of butter and let it bubble until it just starts to brown. I highly advise that you watch it like a newborn baby. Once it is lightly browned, pour off into a bowl and set aside.

In a mixing bowl, combine the sugar, oil, molasses, egg, and vanilla.  Mix this well until it is combined. Add in the flour, salt, baking powder, baking soda, and chocolate chips. Stir until almost combined. Pour in the slightly cooled brown butter. Stir everything around until it is all combined. The batter will be sticky and dark and it should smell like toffee. Try your best not to eat it.

These will spread out, so put 6 scoops of dough on each sheet pan. Put one pan in the fridge and the other in the oven. Set a timer for 13 minutes. Around minute 8, you will see the cookies get really puffy. Around minute 12, they will begin to collapse. Once all of the cookies have mostly collapsed and they are a rich golden brown, remove the pan from the oven and set aside to start cooling. Go ahead and put the other pan in the oven.

Once your cookies have settled and become sturdy enough to handle with a spatula, transfer them to a wire rack to finish cooling. If they are not sturdy enough to move, let them rest on the pan for another couple of minutes.

These cookies will be crispy on the outside with a soft and chewy center. They will have a sweet and salty toffee flavor with bits of chocolate throughout. I think you will love these. They taste amazing and they will make your house smell pretty wonderful.

DSC_1048DSC_1057DSC_1059

I am praying for all of you during this Holy Week. May God bless you and keep you always.

Lots of love and many blessings,

Chelsea

The Lord GOD has given me
a well-trained tongue,
that I might know how to speak to the weary
a word that will rouse them.
Morning after morning
he opens my ear that I may hear;
and I have not rebelled,
have not turned back.
I gave my back to those who beat me,
my cheeks to those who plucked my beard;
my face I did not shield
from buffets and spitting.

The Lord GOD is my help,
therefore I am not disgraced;
I have set my face like flint,
knowing that I shall not be put to shame.

Isaiah 50:4-7

Stovetop Popcorn

My family and I gave up fast food for Lent. It has actually been great. I don’t find myself craving it or thinking about it when I don’t feel like making dinner. It has also made me realize that I can make better treats at home for things like movie night and times where we just feel like playing all day with fun snacks.

My best friend tagged me in a post on homemade popcorn. We both agreed that making it would be on our agenda! I remember having this a couple of times when I was younger and thinking that it tasted so much better than the bagged stuff. I hope you love this recipe and I encourage you to try making it for your next family movie night. It is simple and really inexpensive. Not to mention, your kids and friends will probably think you are really cool for making popcorn.

Stovetop Popcorn

DSC_1010

You will need:

  • 3/4 c popcorn kernels
  • 1/4 c canola or peanut oil (you want an oil with a high smoke point here- so do not use butter, coconut oil, or olive oil)
  • salt and melted butter to taste (or whatever popcorn seasoning you like!)

Set a heavy bottomed pot (4qt or more) on the stovetop. Add in 1/4 cup of oil to the cold pan and drop in 2-3 kernels. Turn the heat to high and putthe lid on. Once those kernels pop, add in the remaining kernels all at once. Put the lid on and give it a good shake. Once the kernels begin to rapidly pop, turn the heat down to medium and let it go! Give it a good shake every 30 seconds or so. Once the pops space out to every 3-4 seconds, turn it down to low until it finishes popping. Remember to continue to shake it every 20-30 seconds. When you don’t hear the pops anymore, immediately remove the pan from the heat.

Season the popcorn how you like and enjoy! My 2 year old couldn’t resist while I was taking photos. She stuck her grubby little hands into the pan multiple times.

DSC_1015

Lots of love and many blessings,

Chelsea

Only goodness and kindness follow me
all the days of my life;
And I shall dwell in the house of the LORD
for years to come.

Psalms 23:5-6

Overnight Steel-Cut Oats

Breakfast food is one of my favorite food categories. I prefer to make breakfast for dinner due to my serious lack of morning enthusiasm. I was not created with a morning “go to!” attitude…. therefore,  I don’t usually have the internal fortitude to cook a full meal before 8:00 AM. I lean toward plenty of coffee, cereal, oats, toast, etc. My kids prefer when my husband is here because he will get up and make an eight course breakfast for them (thank you God for a husband who is a morning person!). Here is a recipe for overnight oats. These are always delicious and my kids love them too! You can make these the night before in a coffee cup, mason jar, or a bowl. I hope you love this recipe!

Overnight Steel-Cut Oats

DSC_0868

You will need (per person):

  • 1/2 c of raw steel-cut oats
  • 1 1/4 c milk  (if you are using fat free, add an additional 1/4 c)
  • 1 tsp honey
  • 1/2 tsp cinnamon

In a cup or bowl, add in the steel-cut oats, milk, cinnamon, and honey. Give it a big stir. A side note- fat-free milk will absorb a lot more than a fattier milk. Add in 1/4 cup more if you are going the fat-free route. Cover with plastic wrap or a paper towel and place in the fridge for 8 hours.

In the morning, give it a big stir and eat it with a spoon (like cereal). There should be liquid still hanging around. If not, give it a little splash before eating. These are delightfully chewy and have a wonderful mouth feel.

DSC_0861

I hope you love this recipe!

Lots of love and many blessings.

Chelsea

Blessed are those who dwell in your house, O Lord;
they never cease to praise you.

Psalms 84:5


Panko Crusted Chili and Ginger Salmon

Happy Feast day of St. Joseph! I wanted to do something special for this day as St. Joseph was a hard working carpenter and a great example for men to look up to. St. Joseph loved God and honored him by loving Jesus as his own son. This meal is centered around two ingredients that are quite symbolic: fish and breadcrumbs.

If there is a meal other than bread that makes me think of Jesus…it is one that includes fish! There are plenty of references in the bible when it comes to fish, so I deemed this appropriate. The other ingredient, breadcrumbs, symbolize the sawdust that would be found in St. Joseph’s work area. This is a popular choice in Italian cuisine as well.

This recipe is one that I don’t make often, but when I do, it is loved by everyone who eats it. The salmon is brushed with a sweet chili and ginger marinade and then coated with a panko and herb crust. I think you will enjoy this!

Panko Crusted Chili and Ginger Salmon

DSC_0882

You will need:

  • 4-6 skinless salmon filets (you can also use one large salmon filet. Up to you!)
  • 1 c panko bread crumbs
  • 3 Tbsp chopped green onion
  • 3 Tbsp chopped cilantro
  • 2 Tbsp sesame oil
  • 2 Tbsp sweet red chili sauce
  • 2 Tbsp low sodium soy sauce
  • 2 tsp fresh ginger, finely grated  (you want it to be a fine pulp)
  • 2 tsp salt
  • Canola or olive oil spray

Preheat your oven to 375*F. Line a sheet pan with parchment paper or a silicone baking mat. Lay the salmon filets on the sheet and lightly salt each one.

In a bowl, combine the red chili sauce, soy sauce, and ginger. Give it a stir and brush onto each salmon filet. You want to generously coat each one (be sure to get the sides, too!)

In another bowl, add in the panko, green onions, cilantro, and sesame oil. Give it a big stir. Using your hands, put a generous amount on each salmon filet. Lightly press down to ensure the panko is sticking to the sauce.

Lightly spray the panko topping with canola or olive oil. Put the pan in the oven and bake for 15 minutes until the panko is light golden brown.

Serve over jasmine rice and enjoy with a side salad or fresh vegetables.

DSC_0875

I hope you love this recipe! It is delicious, quick, and always tasty.

Lots of love and many blessings,

Chelsea

The Call of the First Disciples.

18 As he was walking by the Sea of Galilee, he saw two brothers, Simon who is called Peter, and his brother Andrew, casting a net into the sea; they were fishermen. 19 He said to them, “Come after me, and I will make you fishers of men.” 20 At once they left their nets and followed him. 21 He walked along from there and saw two other brothers, James, the son of Zebedee, and his brother John. They were in a boat, with their father Zebedee, mending their nets. He called them, 22 and immediately they left their boat and their father and followed him.

Matthew 4: 18-22


Braised Short Ribs with Creamy Polenta

It is Monday! Thanks be to God for another beautiful week. The weather has warmed up around here and I am really looking forward to more outdoor park days with my kiddos.

My sister asked me to write a recipe with polenta. She has been wanting to make it and I have had the urge to braise some short ribs lately. I figured I would put them together and see how it goes. I am happy to report that it was a hit! My kids were licking their fingers and I went back for seconds. I hope you love this recipe!

Braised Short Ribs with Creamy Polenta

DSC_0920

You will need:

For the short ribs:

  • 4 boneless short ribs, cut into thirds (or 6-8 bone in short ribs)
  • 1 medium yellow onion, thinly sliced
  • 6 cloves of garlic, cut in half lengthwise
  • 1 c red wine (I use Cabernet Sauvignon)
  • 2 c beef broth
  • 2 Tbsp concentrated tomato paste
  • 2 Tbsp flour
  • 2 Tbsp canola oil
  • 2 tsp salt
  • 2 tsp pepper
  • 1/2 tsp dried thyme
  • 1/2 tsp dried oregano
  • 1/2 tsp dried parsley
  • 2 bay leaves

For the polenta:

  • 1 c polenta
  • 4 c chicken broth (you can use water here, but the broth adds better flavor)
  • 1 c freshly grated Parmesan cheese
  • 2 Tbsp butter

Preheat your oven to 300*F.

Put a shallow braising dish over med-high heat and let it get hot. Off to the side, season the short ribs with salt and pepper. Dust each piece with flour. Pour the canola oil into the braising pan and sear the short ribs on all sides until dark brown. This crust will add excellent flavor!

Once all of the short ribs have browned, turn the heat down to medium and move the short ribs to a bowl. Set to the side.

Saute the onions in the leftover oil and fat from the short ribs until they are lightly browned (about 2-3 minutes). Add in the tomato paste and stir around until it is bubbly. Add in the garlic cloves. Stir everything together and let it cook for an additional 2 minutes.

Bring the heat back up to med high until everything is really starting to sizzle. Pour in the wine and scrape the bottom of the pan with a wooden spoon. These brown bits are called fond. They will flavor the braising liquid beautifully!

Once you have released all of the fond, turn the heat back to high and reduce the wine until it is thick enough to coat the back of your spoon. It will look like a gravy. Once it has thickened, add in the beef broth, dried seasonings, and bay leaves. Give it a big stir and bring to a boil.

Nestle the short ribs into the simmering braising liquid, cover, and put in the oven for 1.5 hours.

When your timer says you have 40 minutes left, go ahead and start prepping the polenta.

Bring the chicken broth up to a boil. Add in 1 cup of polenta and stir. Lower the heat and stir until it thickens but is still pretty loose. Cover, turn the heat to low, and allow to cook for 30 minutes. Stir it every 5-6 minutes.

Once the time is up, add in the butter and Parmesan cheese. Stir until combined.

Spoon the polenta onto a plate, pile on the short ribs, and drizzle with the braising liquid. Enjoy each savory and creamy bite! I know we did.

DSC_0915DSC_0920DSC_0926

I hope you love this recipe. It is incredibly satisfying, and one that will please the whole family.

Lots of love and many blessings,

Chelsea

Jesus said to his disciples:
“Be merciful, just as your Father is merciful.

“Stop judging and you will not be judged.
Stop condemning and you will not be condemned.
Forgive and you will be forgiven.
Give and gifts will be given to you;
a good measure, packed together, shaken down, and overflowing,
will be poured into your lap.
For the measure with which you measure
will in return be measured out to you.”

Luke 6: 36-38